


Every product on this page was carefully chosen. I may earn a commission if you make a purchase through a link. See my full disclosure.
If you’re here right now, you’re probably thinking about how to start a blog and make money. I remember how clueless I was going into the blogging world. I had no clue where to even start. Of course, that lead to do a lot of research on how to start a blog. To tell you the truth, I felt like a lot of the articles I read were basically saying the same thing over and over. For instance, they would tell you what you had to do, but not how to do it.
However, you should come out of this article with a clear understanding of everything you need to do start your blog and get it off the ground.
Whether you’re on the fence about starting a blog or know for sure that it’s your calling, I’m here to give you the cold hard facts and help you through the process. You’ll have your blog up and running (kind of) in no time! Before we get into how to start a blog, there are a few things I need to tell you.
So You Want To Blog?
I know, I know, stupid question. Why would you be here if you didn’t want to start a blog? My reasoning behind this question is so I can give impart some advice I wish I had gotten before beginning my blog.
What I Wish I Knew
First off, if you’re in it for the money, that’s fine, but know that it’s not a get rich quick scheme. It’s a lot of work. You’ll probably want to give up about a dozen or so times which is when you’ll need to think about the endgame. Perseverance is key people. Don’t give up.
Secondly, your website won’t be up and running instantaneously. Yes, the bare bones will be activated, but you’ll still need to create some content, get a theme, figure out how to get traffic, deal with the horrors that comes with the techy world and much more. Trust me, that last point I made is not fun. I don’t think the learning curve will ever end honestly.
Thirdly, money is needed for this process to run smoothly. You’ll definitely need to buy a domain and a hosting service, maybe a theme and some possible add-ons which I will talk more about later. See, when I started my research on blogging, I didn’t realize the costs which may not be a lot, but, let me tell ya, it felt like a lot.
One last thing, if you ever read that you can set up a website in less than 15 minutes or so, don’t believe it. Yes, it may be true technically, but if you’re not tech savvy, it can get confusing, quickly. Then you’ll be sitting there trying to figure out how to connect your domain to your host and that’s just a bundle of fun.
Well, if you’ve made it this far, join me on this crazy train and prepare yourself for a step-by-step guide on how to start a blog.
Still, do additional research, that never hurts. Also, make yourself some hot chocolate. That’ll soothe the soul. Hopefully.
Figure Out Your Niche

First things first, you need to select a niche or at least figure out what you want to blog about.
Now, almost every article I read emphasized choosing a niche, especially one that’s lucrative. However, I don’t think that’s necessarily necessary. Don’t feel you need to constrict yourself to a specific niche because there are lots of websites that don’t.
If you’re indecisive like me then picking a niche can be mentally draining. That’s why I decided to combine a bunch of topics and go from there.
Still, if you’d rather niche down, try thinking of some topics that interest you. Once you’ve made a list, think of some keywords that go with each of those niches. Now you can see which niche is popular by checking out these keywords on SEMrush, Google Rank Checker or Ahref’s.
Before I move on, I’ll give you the lowdown of some of the most lucrative niches: making money (online), relationships, weight loss/fitness, health and travel.
These are all great topics to go into if you want to start making money, but they’re not the end all, be all. You can probably make money in anything if you put your mind to it.
For instance, you could also choose to make your blog about camping or fishing. If you’re passionate about beauty products you can make your blog about makeup products or skincare. Honestly, you can even make your niche Halloween or animal tattoos.
You should be semi-passionate about it or you’ll most likely have to force yourself to write posts and research what your audience is interested in. You do want your creative process to be like pulling out nails.
Choose a Name and Domain for Your Blog

What is a Domain Name You Ask?
A domain is the www.yourwebsite.com address that every single website must have. This sometimes also happens to be the name of your website as well.
When you’re creating your domain, you have the option of a few different extensions including .com, .org, .net and so on. In my opinion, the .com extension is the best and ranks better, but it won’t hurt to do something else if that’s the only way to get the domain you want.
Where to Buy Your Domain
You can either buy your domain name and hosting from two different companies or you can get them both through the same company. Each options comes with some pros and cons which you can read more about here.
I went with the first option when I bought my domain from GoDaddy and hosting with SiteGround. I’m pretty satisfied with my decision if that helps at all.
So you can go to GoDaddy and in the search box you can type in whatever you want your name to be to see if it’s available. If your experience is anything like mine, then your first 50 ideas will probably be taken. If available, they’ll cost over $1,000. Not exactly ideal.
When you finally find a domain that’s available and you actually like, go ahead and buy it. The price for GoDaddy domain names with the .com extension are $2.99 for the first year and $14.99 for any additional years. Not too shabby.
There are also some add-ons you might want to add on including the domain privacy and automatic renewal. You wouldn’t want your domain ownership to expire and forget to renew it. Someone might just snap it up and you won’t be a happy camper after that. So be safe and automatically renew!
Naming Your Website
Before you even begin to pick out a name, think about your niche and the topics of your website. For instance, if your blog centers around being a mom, then you wouldn’t want to name it Snow & Ice. That wouldn’t make sense and would probably end up steering away potential viewers/subscribers. Instead, you may want to name it A Mommy’s Purpose or The Sleepy Momster. Something that speaks to your target audience.
If you really can’t think of a name, use your name. There’s nothing wrong with that and it’s something that’ll never get old. I mean, it’s your name. You’ll be branding yourself.
A piece of advice, don’t rush the process. I tried doing that at first until I realized they were all crappy names. Instead, try brainstorming and allowing your mind to wander a bit. Make a list to help guide your ideas and it’ll eventually come to you.
An even better idea is to ask some friends or family members for their input. Like the saying goes, ‘two minds are better than one’ so take advantage of the people around you. I know I did.
Interestingly enough, my mom was the one who came up with my name after she took one of my original ideas and spun it around. Before Perhaps, Maybe Not, the names I had in mind was Maybe, Okay and Possibly So.
Select a Hosting Provider

What is a Hosting Provider?
Now, what exactly is a host? It’s basically a parking spot for your website. This is what keeps your website up and functioning for the world to see. They take care of the backend stuff, so you don’t have to worry about it and keep all those important files safe and sound.
Now, it’s going to cost a good chunk of cash, but this is one of the most important pieces of a successful website. Going with a free blogging platform like Blogger would not be the best idea since you won’t have full control of your website. It can be easily deleted without your consent or knowledge which has happened to people before. So if you’re in this for the long haul, go with quality, it’ll pay off in the end.
Which Hosting Provider is Best?
I have used SiteGround from the beginning and love it. Their interface is easy to understand if you’re not tech-savvy and they have tutorials if you come across any problems. I definitely recommend going with SiteGround if you’re on the market for a hosting provider that will keep your site safe and quick as a whip. For a more thorough review, check out this review of SiteGround for more information.
RELATED: Start a Blog with This Excellent Host
Their plans include StartUp, GrowBig, and GoGeek; I chose GrowBig which is the best seller. You can buy GrowBig at the discounted price of $9.99/month instead of $24.99/month. Rather than paying a fee every month, you can make a quick and easy payment for the year, at a discounted price of $119.88, saving you over $170.

There’s also some extra services which you can add on such as the SG site scanner, but that’s not necessary. Also, if you do end up getting your domain name with SiteGround, it might be a good idea to add the domain privacy so your information isn’t open to the public.
Decided to go with SiteGround?! Want to properly set up your website? Follow this beginner’s guide to successfully set up your blog. With this visual step-by-step guide, your blog will be up and running in no time!
Pick a Blogging Platform

What is a Blogging Platform?
A blogging platform is a service or software that allows you to publish your content; moreover, this is what you install after getting your host.
There are free options like Wordpress.com, Blogger, Medium and Tumblr, but I wouldn’t recommend those if you want more flexibility and full control over your blog/website.
Some of the better options include Wordpress.org, Joomla, Ghost, Drupal and Weebly. Some of these may have a free option, but if you’re serious about this then it’s always better to go premium. However, if you buy Siteground, you have the option to auto install Wordpress.org or Joomla at no extra cost.
Which Platform?
I currently use Wordpress.org which works great and has a ton of available plugins and themes. There isn’t much of a learning curve, so you won’t have to worry about that if you’re not a techy type of person.
Now, you’re probably wondering what the difference is between WordPress.org and WordPress.com:
WordPress.com
- Is a host that allows you to set up a website/blog
- It’s free
- No control over your website
- Ads are not allowed, so monetizing will be difficult
- Plugins are limited and you won’t be able to upload custom ones
- No backend code, database or file access
- Will be a subdomain of wordpress.com, so domain will look like yourwebsite.wordpress.com
- Restricted to free and premium themes only found on wordpress.com (limited theme support)
- No branding capabilities
WordPress.org
- Requires you to have a separate hosting service so you can download the WordPress software
- It’s free to download to your website
- Full control over your website (you own it)
- Can sell ad space
- Will have access to all plugins
- Can edit backend codes, databases and files
- Have your own unique domain name which will look like yourwebsite.com
- Can upload whichever themes you prefer to further customize your website
- Will be able to brand your website
Overall, it’s better to go with WordPress.org since you’ll have full control and have the option to eventually monetize your blog/website. If you start out with WordPress.com you might run into some roadblocks down the road.
Finding a Theme

Alright, so if you went with wordpress, then you’ll already have thousands of free themes on your hands, all approved by wordpress.org. If that doesn’t excite you, I don’t know what will.
The first theme I ever used was Olsen. I did like that theme, but it was the free version which means one thing in the world of technology; limited features. Still, I made it work for awhile until I got tired of it. Then I went off the deep end and bought a theme. You have much more flexibility with a premium theme which is why I would recommend buying one when you are able to. If you’re not sure if you want to put that kind of money down though, there is nothing wrong with a free theme.
Here are the exact pros and cons of free and premium themes…
Free vs Premium Themes
Let’s take a look at the pros and cons of free and premium themes to get you looking in the right direction.
Free Themes
PROS
-
Ease of Use
This shouldn’t be surprising since free themes are practically created with beginners in mind. They let you get a feel of what a theme can do which helps with any learning curve. Overall, if you’re just starting out, then it doesn’t hurt to start with a free theme until you’re ready to move up to the big leagues.
-
It’s Free
Well, that’s the one main benefit of free themes. No money necessary. Now you may think there’s a catch, but there isn’t. You can get a high-quality theme at no extra cost for you. However, you shouldn’t download a free theme from the internet since they may be poorly coded which can make your blog/website’s security vulnerable. Instead, make sure to always use a theme from the wordpress.org directory. Those go through rigorous assessments before being released to the public.
CONS
-
Limited Features
Think of a free theme as the lite version everyone hates. Yes, it has all the basic functions you need to get by, but all those fun features, like buttons are locked away. It honestly sucks.
-
Better for the Minimalist
This is definitely better for those who are minimalists at heart. If you’re not or you want your blog/website to stand out designwise, then a free theme won’t be the answer to your prayers. You might want to invest in a premium theme if you want it to be unique.
-
No Support
If you ever run into problems or issues, you won’t receive any help since free themes don’t offer support. Instead you’ll have to DIY and either find a solution online unless you ask a question in the WordPress forum. You can download that plugin if you ever need help.
-
Updates Basically Nonexistent
Since these are free themes, you won’t find the developers regularly updating. This means your theme might be incompatible with future WordPress updates which could pose a security risk to your website.
Premium Themes
PROS
-
More Features and Customizability
Premium themes come with a lot more features and allows for more customization. This is great when it comes to making your website stand out. Some themes even come with paid plugins which makes the hole in your wallet worth it.
-
Updates
One of the benefits that comes with a premium theme is the regular updates. This will keep your website up to date, so it’ll be compatible with any future WordPress releases. Plus, the developers may add new features along the way and if there’s any bugs, they’ll get squashed pretty quickly.
-
Support
Support is another biggie when it comes to keeping your website up and running. Many of us aren’t proficient in the art of code, so when a problem appears and we don’t want to make it worse, we can simply ask for help. Makes life much easier and less stressful.
-
More Unique
Since you’ll be spending a pretty penny on a premium theme, you shouldn’t see it as often as a free theme. Furthermore, in this case, money buys uniqueness since a good portion of people might not be willing to spend the dough.
CONS
-
Too Much Bloat
Developers can get trigger happy when it comes to adding unnecessary additional features. This can weigh the theme down and make it pretty bloated which, in turn, may cause your website to load slower. That might end up costing you some traffic, so do some research on the theme before buying it.
-
No Official Review Process
One of the negatives that come with premium themes is the lack of standards. You could end up buying a theme with poor coding if you’re not too careful and don’t check out the reviews/ratings.
-
Can Be Pretty Expensive
Unfortunately, premium themes aren’t domain names. They’re going to cost you a bit more. Expect anywhere from $40 to $100+ depending on where you look.
Top Places for Premium Themes
Since you’re just starting a blog, I would recommend using a free theme at first until you get a hang of things. However, if you decide you want to get a premium theme for the reasons I stated above, I’ll direct you to the right place.
StudioPress offers many beautiful responsive themes. With clean designs that are easily customizable, you honestly can’t go wrong with them. StudioPress themes use the Genesis Framework which is an advanced piece of technology with featured widgets and many other fun features.
Along with StudioPress, there are a few other places including ThemeForest and Elegant Themes. For a more in depth list, check out this post here. Also, for more advice on what to look for when choosing a premium theme, you can check out this post.
Creating Awesome Content

When creating blog posts, write for your audience. In other words, make sure it is of value to them in some way. That can be helping them with a common problem or giving them hacks for packing luggage or even coming up with a list of activities for them to do if they are bored. As long as they get something out of it, they will most likely read through the entire post and might even come back for more.
Another helpful tip is to shoot for at least 1,000 words per post. However, Google will notice if you have a behemoth of a article (around 2,000-3,000 words) which might mean it will appear higher when searched. If you do choose to make a long post, make sure to break it up with headers and have a table of contents at the beginning, so the reader has an idea of what is ahead.
Now, coming up with content can either be fun or downright tedious depending on your brainstorm levels (they vary a lot for me). Moreover, a good idea is to write down ideas on your phone or a piece of paper whenever an idea pops into your head. That way, you won’t forget it later on.
Social Sharing

If you’re like me, you will probably expect people to come flocking to your site at soon as your posts go live . . . well, that most likely will not happen right away. That’s where social media (Pinterest in particular) comes into the mix.
My advice, focus on one or two platforms at first. Don’t spread yourself thin. Instead, become an expert in Pinterest or maybe Facebook, so that you truly get the most out of it. I am currently only using Pinterest and I am still learning new things every week. Be patient and you’ll eventually get a hang of things. You can also take some of the extra time out of the equation by taking courses from bloggers who are already successful and know what to do.
Update (6/25/2019): I created a Facebook page a few weeks ago and I’m currently figuring out how to use it to my advantage. Facebook groups look like they can be a great way to drive traffic to your blog and make connections, so I have started applying to a few.
So far, I have used Pinterest with pretty great results. However, it all comes down to the pin and the title. If the title isn’t catching anyone’s interest, they won’t repin or click through. The design also plays a huge role in pin popularity: font, colors, readability, images, etc.
That’s why it’s best to live by AB testing which means making two or more pins for one blog post. This will give you better insights on which pins do best and why they are having more success.
How Do You Use Pinterest To Drive Traffic To Your Blog?
1) Set up an amazing Pinterest profile and convert it into a Business Account
If you haven’t set up a Pinterest Business account, you will need to do so. It allows you to keep track of your stats and your audience. You’ll need to add a profile picture and description. You could use a personal photo of yourself, but that’s not necessary if you want to keep your privacy. I personally did not want to have my face being the profile picture, but I might change that in the future.
2) Add boards relevant to your topic(s)/niche and audience
You should create 15-20 boards at the beginning that are relevant to what your blog is about. Each board should have a board cover, about 15 pins and a description that is keyword rich. For instance, if your board is about books, you can add keywords like book recommendations, quotes, book lovers, books to read, best books, book lists and so on.
3) Create click-worthy content/pins that will generate more repins/click-throughs
- Pin size should be about 736 x 1104 pixels (or longer)
- Infographics are usually pleasing to the eye with = more pins/clicks
- Images should be clear (no blur)
- Pins with faces tend to not do as well (from what I have gathered from various other articles)
- Cursive types of fonts should be used sparingly since they can be more difficult to read
- Choose 2 fonts that work well together (or you could use 1 font or even 3)
- Remember to put your watermark (your website name) on the pin somewhere so people will always know it’s your pin
- Titles should grab peoples attention, so they click it…but make sure you deliver with your content if it’s a click-batey type of title. Don’t annoy your audience
4) Join group boards
Group boards no longer have as much power as they once did, but they can still be helpful for anyone with a low reach. I would suggest finding group boards with PinGroupie or by searching for keywords and then clicking the boards option. That will show you all the related boards and if there are multiple profiles in the profile picture, that means it’s a group board.
One thing that I do is look at (stalk) other accounts in my niche with similar rankings/reach to see which group boards they belong to. If they were accepted, that most likely means I’ll be able to join too. Sometimes there will be a button on top that says ‘Request To Join’ which makes it easy. However, if that button is not there, you will have to follow the instructions listed in the description.
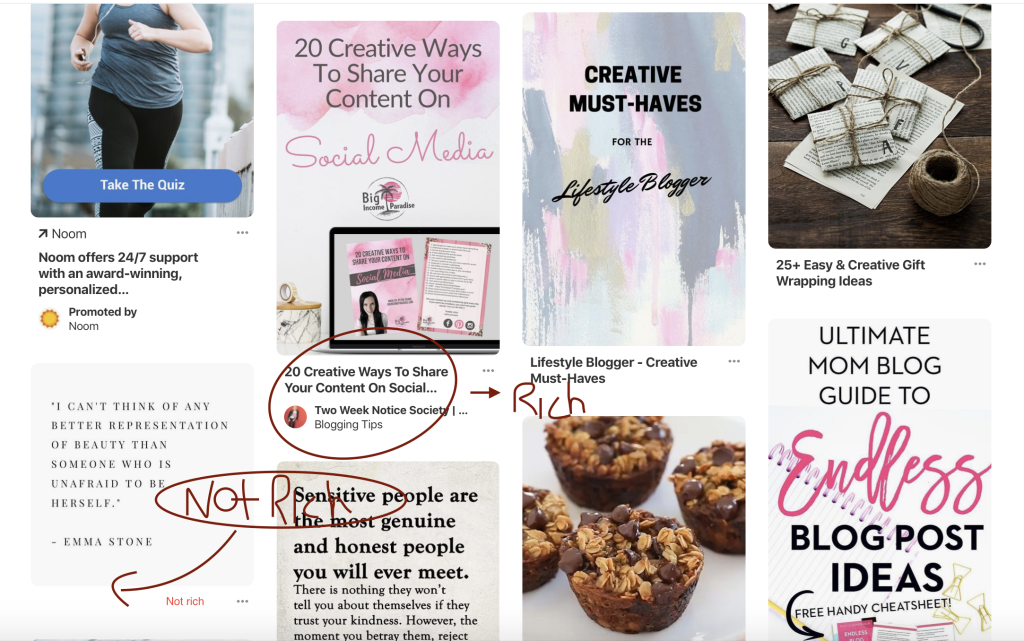
5) Set up Rich Pins
Rich pins are pins that have extra information. You will see the title in bold underneath the pin and some will show the author of that pin as well. An added benefit of Rich Pins is the follow button that appears next to the pin. It makes it much easier for pinners to follow you when your follow button is right below or next to the pin. I have also read that Pinterest rewards people more if they have Rich Pins set up (since they tend to do better in the search engine).
For the past few weeks, I’ve been trying to set them up, but it hasn’t been working which is incredibly frustrating. I wasn’t sure if I was doing something wrong, so I emailed the Pinterest Help Center and was eventually told that there is a technical issue going on that is preventing pins from appearing Rich even when the application has been approved. They’re currently working to fix the problem, so I’ll get back to you guys once it’s remedied.
How to set up rich pins (this will only take a few minutes)
- If you don’t already have the plugin Yoast installed, you’ll need to go download that first
- Once that’s installed, click the Social tab and go to Facebook
- Enable Open Graph meta data
- Go to the Rich Pin Validator and put in a url to one of your blog posts. After that, you’ll need to put your domain link into the validator and you should get a message saying your application was successful.
So that’s the quick way to set up Rich Pins. The pins can show up as rich in a few hours or a few days (unless this technical problem is still going on, then it may take some more time).
6) Join Tailwind
I live by Tailwind. At first, I remember being a bit skeptical about whether it would actually work or not, but after reading many reviews and seeing the results, I decided to give it a go.
I signed up for the free trial which allows you to schedule 100 pins and join 5 tribes. Not only did it free up time originally spent manually pinning, but it will also pin your content during optimized times when your audience is on Pinterest.
There are also tribes which you can join. In a tribe, for every pin you share, you have to share 1-2 pins from someone else. If you are not sharing other content, then you may be removed from the tribe. Moreover, you should publish other pins because it may also lead to that person sharing something of yours. It can be a reciprocal system and everyone loves that.
For me personally, my first pin that went kind of viral got around 400 repins after a few tribemates pinned it. Then another recently has over 2,oo0 which is amazing. Never estimate the power of the Tribes.
Try Tailwind For Free
Now, if you want to try it out and test the waters, then you can use my referral link for Tailwind and get your first 100 pins free plus a $15 credit to your account when you upgrade to PLUS. That’s another free month of Tailwind. So if you’re sick of manually pinning or just don’t want to, you can easily schedule them with Tailwind and no longer have to spend as much time on Pinterest.
If you want to see my results from Tailwind, then check out what I have to say here. I honestly cannot recommend this tool enough. I love it! I even took the plunge and upgraded to the plus plan (it took me a few months to finally come to that decision).
Upgrade (6/26/2019): After upgrading to PLUS, I reached my limit for Tribes which happens to be 30 pins for month. I still had 17 more days before it would reset again which lead me to a few agonizing days where I could literally feel all the potential repins I could be getting (if I powered up), laughing at me. Yeah, I did it. I bought the first PowerUp.
Now I can post 80 pins per month to my tribes and instead of five tribes, I can join 10. The best part is, my tribe reach has increased to 2.2 million!!! I’m in love with Tailwind. It’s my favorite tool and has been a massive help to growing my blog and increasing my blog traffic.
Get that SEO Working

If you’re serious about this, then you can’t only rely on social engines/platforms to bring you traffic. Their algorithms could easily change one day which could potentially lead to your traffic taking quite the hit. However, organic traffic is the exact opposite of that.
Visitors are considered to be organic when they find your website after typing a specific keyword/phrase into the search bar (like Google). This is a great source of traffic since people are constantly looking things up on the internet. Depending on your keyword, you can easily get hundred and thousands of visitors each month (even per day) if you play your cards right and optimize those bad boys up (i.e., your articles).
To make sure that your post is optimized for the search engines, you will need to install the plugin Yoast. This will allow you to choose a keyword for each post and will give you pointers for improving your SEO rating. If it’s not good, it will tell you that it needs improvement and will then show you what you need to do in order to fix it. You can’t ask for a better tool in this department.
This may seem meticulous and frustrating at first, but it becomes much simpler as you get a hang of things. Just remember to add internal links (of related blog posts) since they help to draw in your visitors, causing them to stick around longer.
Monetize Your Blog
It may be hard to believe that you can actually make money blogging, but it is possible. I’m personally still figuring that aspect of the blog out. There is most certainly a unique formula to conquering the monetization side of blogging and I can’t wait to figure it all out.
The main ways to monetize your blog include ads, affiliate programs, sponsored posts and your own products.
Ads
Ads can be a good source of income if you have many page views each day. If not, you probably won’t get enough people clicking on them to generate any money. There is also the aspect of it distracting your readers or leading them to leave your site. This can end up with you losing potential subscribers.
Affiliate Marketing
Affiliate marketing is a much better way to make money off your blog. Almost every product has an affiliate program which also have much higher commission rates compared to ad networks. For instance, within this post, I have added affiliate links to Tailwind and Bluehost. If you click on the link and decide to buy the product/service, I will receive a percentage/fixed amount at no extra cost to you.
The affiliates I belong to include ShareASale, Tailwind, SiteGround, Skimlinks, Amazon Affiliates, VigLink, Awin, and a few more.
Shareasale is great for new bloggers. I applied when I was only getting a few page views a day and I still got accepted. It has many merchants, but you’ll have to apply and get accepted before gaining access to links and banners.
For a complete list of the best affiliate programs, check here.
Sponsored Posts
Sponsored posts are exactly that; posts that are sponsored. Companies will usually reach out and ask for an honest review about their product on your website. This usually happens when you have picked up a nice-sized following and you are seen as an expert in your area. Furthermore, your readers trust you.
Creating Your Own Products
Creating your own products and selling them can become incredibly lucrative. For instance, creating a course that shows you exactly how to make money from your blog (with affiliate marketing for instance) can be something a lot of people will buy (as long as it works). The best way to show that your course works is to show testimonials and the results from your buyers. You can even make things as simple as, say, printables and sell them for 99 cents or you can turn one of your long posts into an ebook on Amazon Kindle.
Overall
A lot of people don’t make it blogging simply because they give up halfway through. Don’t let that be you. Put your blood and sweat into your baby, so you know that you did everything you could. It’s definitely not all fun and games, there’s a lot of backend stuff that can be quite boring and annoying, but if you keep at it, you may just end up with a bangin’ website. Yes, I just said bangin’.
Good luck and when you have your website all set up, let me know in the comments. I’d love to check it out!!!