


If you’re looking to start a blog, you’re at the right place. Today, you will learn how to easily start your own WordPress blog with step-by-step instructions. Creating a blog can feel daunting when you’re starting from scratch which is why I created this guide. I’m here to make the process as simple as possible for you, so you can get it up and moving quickly.
When starting a blog, it’s important to choose an expert hosting platform that will keep your site fast and secure while also providing an intuitive interface that makes it easy to build your site. I chose SiteGround for those reasons and they have never let me down. Their interface is easy to navigate and if you ever need help, they offer excellent customer service. SiteGround is a great hosting platform that I fully recommend for anyone planning on starting a blog.
There will be an upfront cost, but you should be able to make that money back and more through affiliate marketing and ads once you start driving more traffic to your website.
Click here to start a blog on SiteGround at a discounted price of only $4.99/month and follow the guide below to set it up.
How to Start A WordPress Blog on SiteGround
1. Figure Out Your Domain Name
If you already know your domain name, skip to the second step.
A domain name is the www.yourwebsite.com address. Before registering your domain name, you need to figure out the name of your domain. When choosing a domain name, it is important to pick a name that is easy to remember and speaks to your target audience.
For example, there’s ThisIsWhyImBroke, a site that features unique and interesting gifts. The domain name is incredibly catchy and speaks to their general audience. Another good example is MommyOnPurpose which instantly clues you in on what the blog is about. You could also use your name as the domain name like Melyssa Griffin did with her own blog.
Before you decide on a name, you’ll need to make sure that it’s available. To do so, you can go to GoDaddy and type the name into their search engine. If it’s not available with the .com extension, I would suggest finding a different name that has the .com extension since it ranks better. Once you decide on a name, it’s time to register your domain.
2. Register Your Domain
You can either buy your domain name directly through the hosting company or a domain name registrar like GoDaddy. If you’re planning to launch only one site, it’s easier to buy the domain name through the hosting company because they will directly link it to the hosting company. However, if you think you might want to start multiple sites, it’s better to go through a domain name registrar because it will give you more wiggle room in the future. Of course, you will have to direct the domain name to the host on your own. I will explain how to do that below.
Register Domain Name With GoDaddy
- Go to GoDaddy and add the domain name to your cart.
- You can choose to increase or decrease the number of years before your domain name renews at an increased price. I suggest going with two or three years because of the discounted price.
- To protect your domain against any malicious attacks, you can add the Full Domain Privacy and Protection for $9.99/year.
- After that, follow the steps to check out.
Register Domain Name Through SiteGround
- Go to SiteGround and choose a plan. I would suggest going with GrowBig since it allows you an unlimited number of websites and 25,000 monthly visitors.
- After choosing the plan, register a new domain.
- From there, you will be able to review and complete your order. At the bottom, you should see a checkmark next to Domain Registration. If you want to keep your contact information private, you should add Domain Privacy.
3. Buy Hosting For Your Blog

Before we buy anything, let’s go over the pros and cons of each plan:
- As I stated above, the GrowBig plan is best for anyone who plans on creating more than one website. Even if you think you’ll only be starting one, it’s best to have more leeway in case you decide differently in the future. Of course, you can always upgrade from the StartUp plan to GrowBig if you do decide you want to add another website.
- Pricewise, the cheapest plan is StartUp at a discounted price of $4.99/month. If you want to be more cost effective, I would suggest starting out with StartUp since you can upgrade to the GrowBig plan in the future. From there, you will be taken to a page asking for your domain. If you have already bought a domain through GoDaddy, click the second option and if you’re registering it through SiteGround, go with the first option. After that, you will be taken to the billing information page. There you will find purchase information regarding hosting services. I would suggest buying hosting for 24 months, so you will not have to worry about the price of renewing it for another two years.

4. Connect Your Domain Name To Your Hosting Provider
If you bought your domain name through the host, you can skip to the next step.
To point your GoDaddy domain to SiteGround hosting, you will need to change the nameservers in GoDaddy to the SiteGround nameservers which I will explain now.
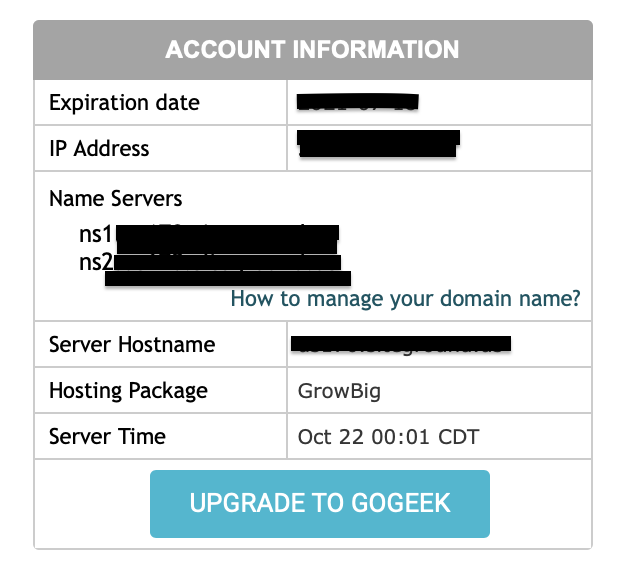
Login to SiteGround and click MyAccounts. Once there, click Manage Account and then go to cPanel. In the left corner under Account Information, you should see the expiration date followed by the IP Address followed by the Nameservers. You will need to copy the Nameservers.
Login into your GoDaddy account and click on your name in the top right corner and then click My Products.

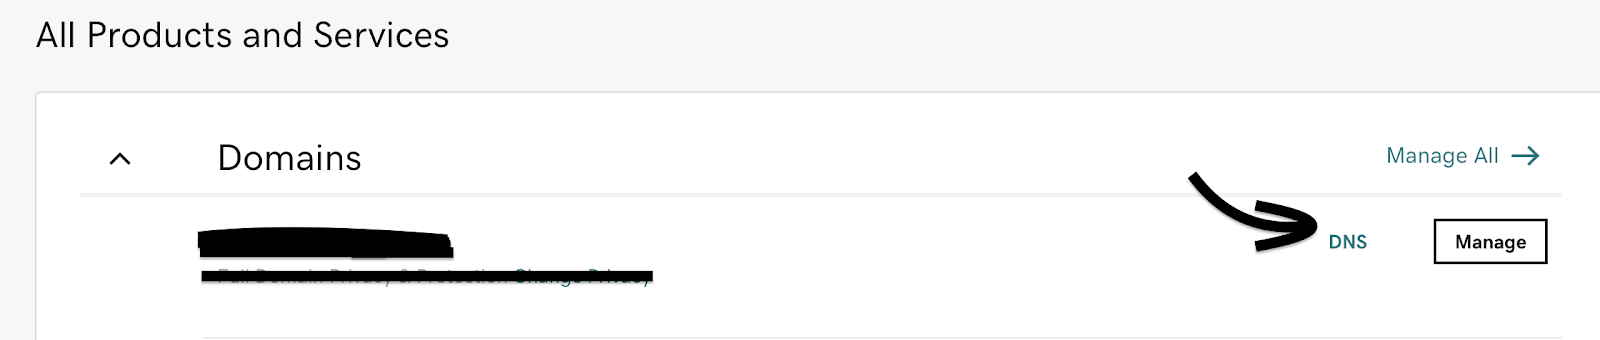
Once you’re there, scroll down so you see the domain listed in rows and click the DNS link.
When you click the DNS link, it will take you to the DNS management page and you will click Change.
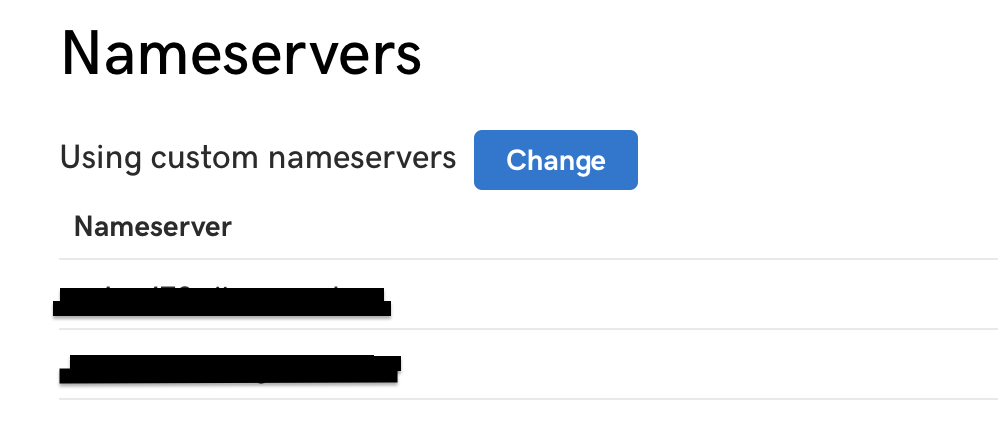
Once you click change, select I’ll use my own nameservers, copy your SiteGround nameservers into the fields and click save. And you’re done!
5. Install WordPress on SiteGround
Now it’s time to install WordPress:
Login to SiteGround and click MyAccounts. Once there, click Manage Account and then go to cPanel. Under Autoinstallers, click WordPress and then install.

6. Add SSL Certificate To Your Domain
Lastly, we have the SSL Certificate. The SSL Certificate is important because it ensures that your site information is protected. A site that is encrypted will have an address that begins with https:// whereas a site that is not encrypted will begin with http:// which is not secure.
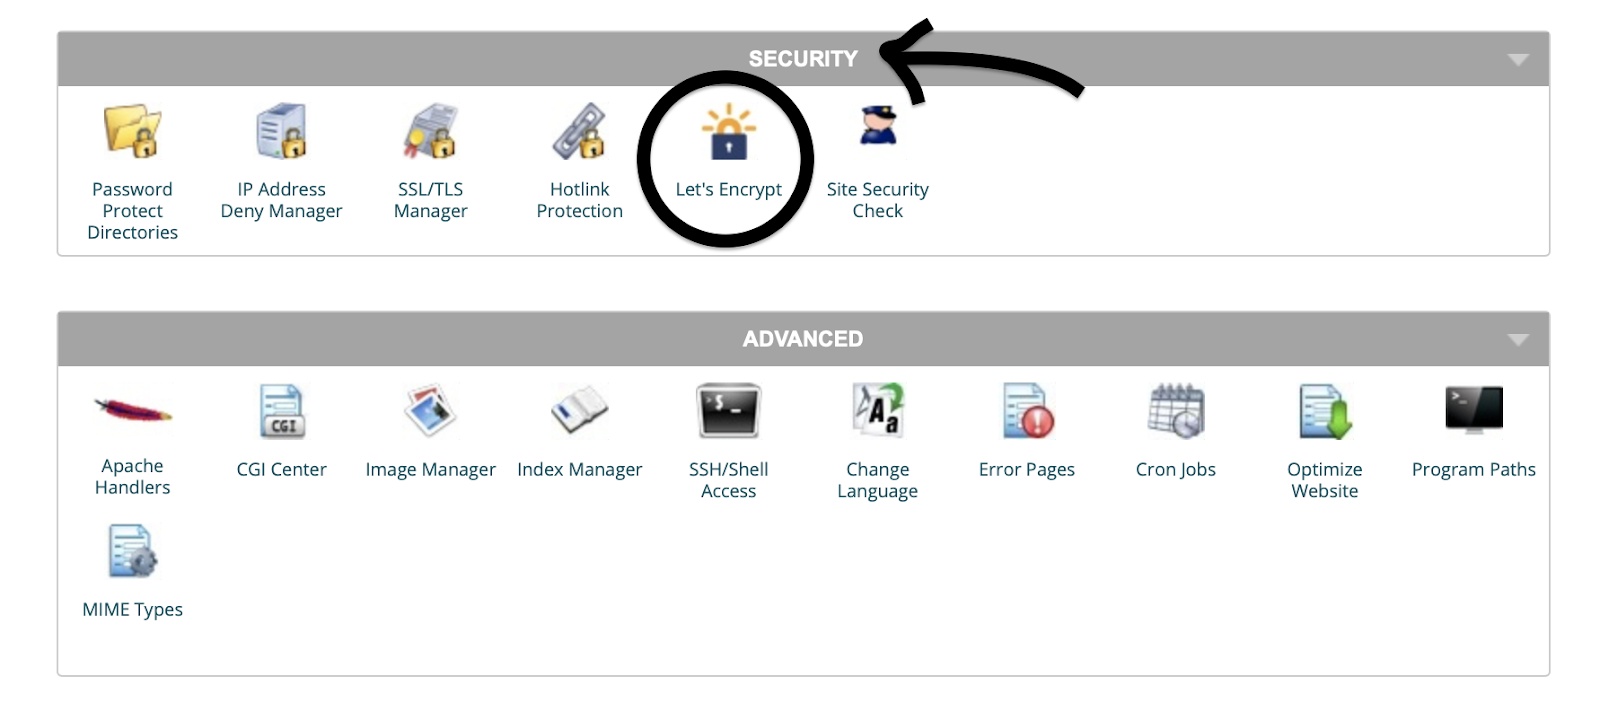
To install the SSL Certificate, stay in the cPanel and scroll down until you reach the Security section. Click Let’s Encrypt. Once there, choose the domain, check Let’s Encrypt SSL and click install. Once it shows that it’s active, you’re good to go!
In Conclusion
Now that you have your website all set up, you can begin adding content, joining affiliate programs and sharing your content on platforms like Pinterest, Facebook and Instagram. Before you do any of that, you will want to find a theme. For more information on that, you should check out the pros and cons between free and premium themes. After that, you should take a look at this guide that goes over the entire process of beginning your own blog and how to increase traffic to your website. If you’re curious about affiliate marketing, I suggest you look over this article that goes over what affiliate marketing is and the best affiliate programs to join.
